Alright, so I figured it was about time I shared my little adventure into the world of key switches. It all started because my old keyboard, bless its circuits, just wasn’t feeling right anymore. You know how it is, some keys were getting a bit iffy, and the whole typing experience was just… meh. I wasn’t about to toss a perfectly good board, so I thought, “Why not try swapping out the switches?” Seemed like a decent weekend project.
Getting Started – The “What Am I Doing?” Phase
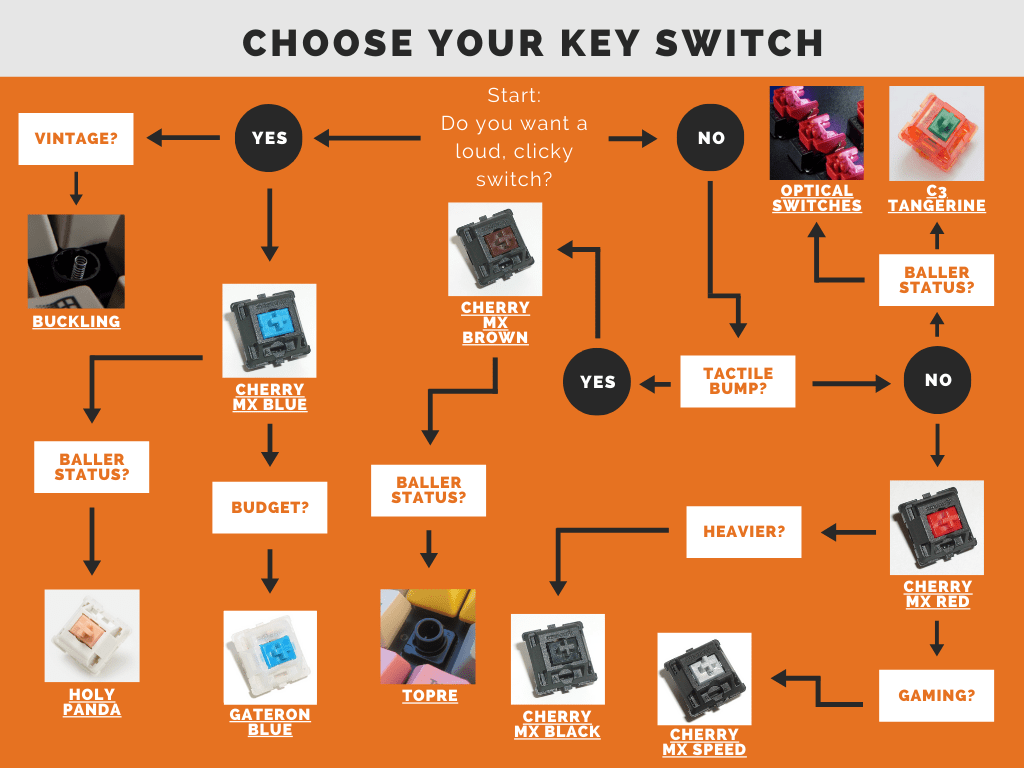
First things first, I had to figure out what kind of switches I even wanted. Man, I went online and it was like diving into an ocean. Linear, tactile, clicky… reds, browns, blues… brands I’d never even heard of. It was a lot. I just wanted something that felt good under my fingers, you know? Not too loud, because I’m not trying to annoy everyone around me, but with a nice, responsive feel.
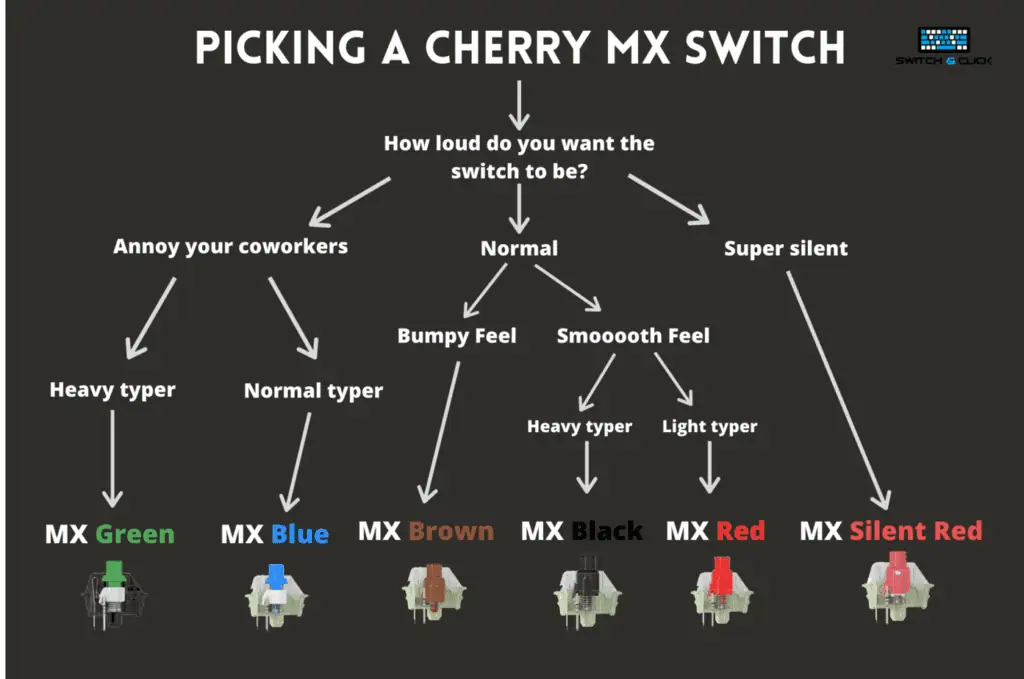
I spent a good few evenings just reading forums and watching videos. Some folks swear by one type, others say it’s trash. It’s like everyone’s got their holy grail switch. I decided to just pick something that sounded like a decent middle-ground, something tactile but not super loud. Ordered a bag of them, along with a cheap keycap puller and a switch puller. Figured I didn’t need the fanciest tools for my first go.
The Nitty-Gritty – Popping Things Off and On
When the parts arrived, I cleared off my desk. First step: get those keycaps off. The puller worked okay, though some of the bigger keys like the spacebar were a bit fiddly. Had to be gentle there. I laid them all out in order so I wouldn’t mix them up later. That’s a pro tip, trust me.
Then came the switches themselves. My board is hot-swappable, which made things way easier. If yours isn’t, well, that’s a whole other ball game involving soldering, and I wasn’t ready for that drama. The switch puller, you gotta get it just right, squeeze and pull straight up. Some came out easy, others put up a bit of a fight. My fingers were definitely feeling it after the first dozen or so. I just took my time, didn’t want to break anything on the PCB.
Putting the new switches in was actually the easier part. You just line up the pins – and make sure you get them straight, because bending those little guys is a real pain – and push them in until they click into place. It was pretty satisfying, hearing that little click each time. I did a few, then checked the pins on the back to make sure they were all the way through and not bent. Slow and steady, that was my motto.
The Big Test and Final Thoughts
Once all the new switches were in, I put the keycaps back on. That part’s pretty straightforward, just press them down. Then, the moment of truth. Plugged it in, opened up a text document, and just started typing.
And you know what? It felt… different. Good different! The new tactile feel was definitely there. It wasn’t a night-and-day miracle transformation that suddenly made me type at 200 words per minute, but it was a noticeable improvement. The sound was a bit different too, a bit more refined, I guess.
Here’s what I really learned from all this:
- Don’t overthink the “perfect” switch right away. You can always try something else later. What matters is if you like it.
- Take your time. Rushing is how you break pins or scratch your keyboard.
- A hot-swappable board is a lifesaver if you’re new to this or just want to experiment without a soldering iron.
- It’s actually a pretty straightforward process once you get the hang of it. A bit tedious, maybe, but not rocket science.
So yeah, that was my journey into changing key switches. It was a bit of a learning curve, but totally doable, and I’m pretty happy with how it turned out. My old keyboard feels new again, and I picked up a new skill. Not bad for a weekend’s work, right?